Well, for me, my first thought about embroidering toilet paper was, “Why in the hell am I embroidering on toilet paper?”
Once I got over the initial shock of doing such a silly project, it was really fun! Here are my tips on doing it right the first time.
- Use the right font.
I love the show Project Runway. Are you a fan? Have you ever heard Tim Gunn say that challenges are won or lost at Mood (their fabric store?). Much like the delicate choice of fabric for a fashion designer, we have to be choosy with our fonts and designs as we all know that our project’s success sometimes is charted before we even turn on the machine!
If you’re making your own design using fonts you have in your software, make sure the font(s) you choose are nice and thick. I made the mistake of using a pretty thin font – one of mine, called Maximus.
After the first few letters stitched out, I realized this was not going to work! So I went into my handy Embrilliance Essentials software and bumped the pull compensation of the letters up to 3. Then I started over. As a good rule of thumb, I suggest comparing the width of the letters’ stitches to an applique’s satin stitch. If it looks like it would be a good width for a satin stitch, you’re probably good to go.
The good news is, it’s just toilet paper, so if it’s not right, you tear off a square and start over. No biggie. ?
- Stay away from dense fills.
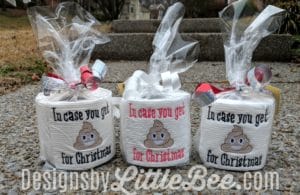
Vintage style stitches or sparse fills are best for stitching on toilet paper. It just won’t hold up well to a dense design. In the sample above I used a “poop” design that is very sparsely filled. It takes maybe two minutes to stitch out. I’ve uploaded it for free in my Facebook group; simply join and look at the link on the left for “Files.”
- Use extra stabilizer.
I use two pieces of tearaway for each project. In my opinion tearaway/cutaway doesn’t matter. I’d just run out of my cutaway so I used tearaway for the ones I made this season.
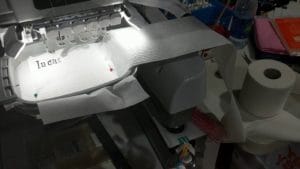
- Fold and pin to stabilizer gently.
I was using some pretty quilted toilet paper, which wouldn’t be my first choice for obvious reasons (sinking stitches). But it’s what we use in our house so it’s what I had on hand. Because it’s so thick and plush, I only folded mine twice – so that I was embroidering on three squares on top of each other. If I were using a thinner toilet paper, I’d probably fold it three times, which would stitch onto five squares.
- Make sure the embroidery is facing the right way.
The second roll I stitched, I actually stitched it backwards – so when I re-rolled it, the design was facing inside the roll. Make sure you pull your toilet paper off the roll and orient it correctly to re-roll with the design on the outside. If you do mess this up, just tear a few squares down and roll it properly around the roll before you package. No big deal.
- Pin gently.
I like to put a pin, gently, at each of the four corners of the toilet paper squares. Take your time or you’ll tear it.
- Set the roll aside.
Pull off enough to give your machine room to stitch, and set the rest of the roll nearby.
- Go for it!
The good news about this project is that it’s toilet paper! You can feel free to experiment with what works best for you and your machine, because your project is disposable. For example, I like to set all my toilet paper designs to stitch from the center fist, so that my gentle pinning doesn’t get abused by the shifting of left-to-right. I don’t even know if that makes sense to you, but that’s the way I like to do it. I also slow my machine down just a tick (600 spm), again my personal preference to be extra gentle.
Got any other tips? Feel free to comment below! ⬇️
I did my 1st one aa week ago, The 1st try ripped. There on my table was felt.. it worked great
Awesome tips and love the design. Thank you so much
Thanks for sharing, I just might have to take the time to do this for my grown children.